How Does XTLS REALITY Work?
What is SNI?
Server Name Indication (SNI) is an extension to the TLS (Transport Layer Security) protocol that allows a client (such as a web browser) to specify the hostname (domain name) it wants to connect to during the initial TLS handshake. This enables a server to present the correct SSL/TLS certificate for the requested domain, even when multiple domains are hosted on the same IP address and port
Before SNI, each HTTPS website with its own SSL certificate required a unique IP address. This was inefficient and contributed to the exhaustion of IPv4 addresses. SNI solves this problem by allowing multiple domains, each with their own certificate, to share a single IP address. This makes web hosting more efficient, cost-effective, and scalable, and helps conserve valuable IP resources.
Without SNI, a server wouldn't know which certificate to present during the handshake, potentially causing errors or security warnings for users
How SNI Works
sequenceDiagram
    participant Client
    participant Server

    Client->>Server: Initiate TCP connection
    Client->>Server: Send TLS Client Hello (includes SNI: domain name)
    Server->>Server: Check SNI field for requested domain
    Server->>Client: Present matching SSL/TLS certificate
    Client->>Server: Complete TLS handshake
    Client->>Server: Send HTTPS request
    Server-->>Client: Send HTTPS response
SNI Whitelist
SNI whitelist refers to a security or network policy mechanism that uses the Server Name Indication (SNI) field in the TLS handshake to determine which HTTPS connections are allowed or bypassed by a firewall, proxy, or other security device.
sequenceDiagram
    participant Client
    participant Firewall/Proxy
    participant Server

    Client->>Firewall/Proxy: Initiate TCP connection
    Client->>Firewall/Proxy: Send TLS Client Hello (includes SNI)
    Firewall/Proxy->>Firewall/Proxy: Inspect SNI field
    alt SNI matches whitelist
        Firewall/Proxy->>Server: Forward TLS handshake (no interception)
        Server-->>Client: Complete TLS handshake
        Client->>Server: Send HTTPS request
        Server-->>Client: Send HTTPS response
    else SNI not in whitelist
        Firewall/Proxy->>Client: Intercept or block connection
    end
[!NOTE]
SNI whitelisting only works when the SNI is transmitted in plaintext. If a client uses TLS 1.3 with ESNI (Encrypted SNI) or ECH (Encrypted Client Hello), the SNI field is encrypted and cannot be inspected by intermediaries, rendering SNI whitelisting ineffective. In response, some censorship systems (such as the Great Firewall of China) block all connections using ESNI or ECH to maintain control over accessible domains
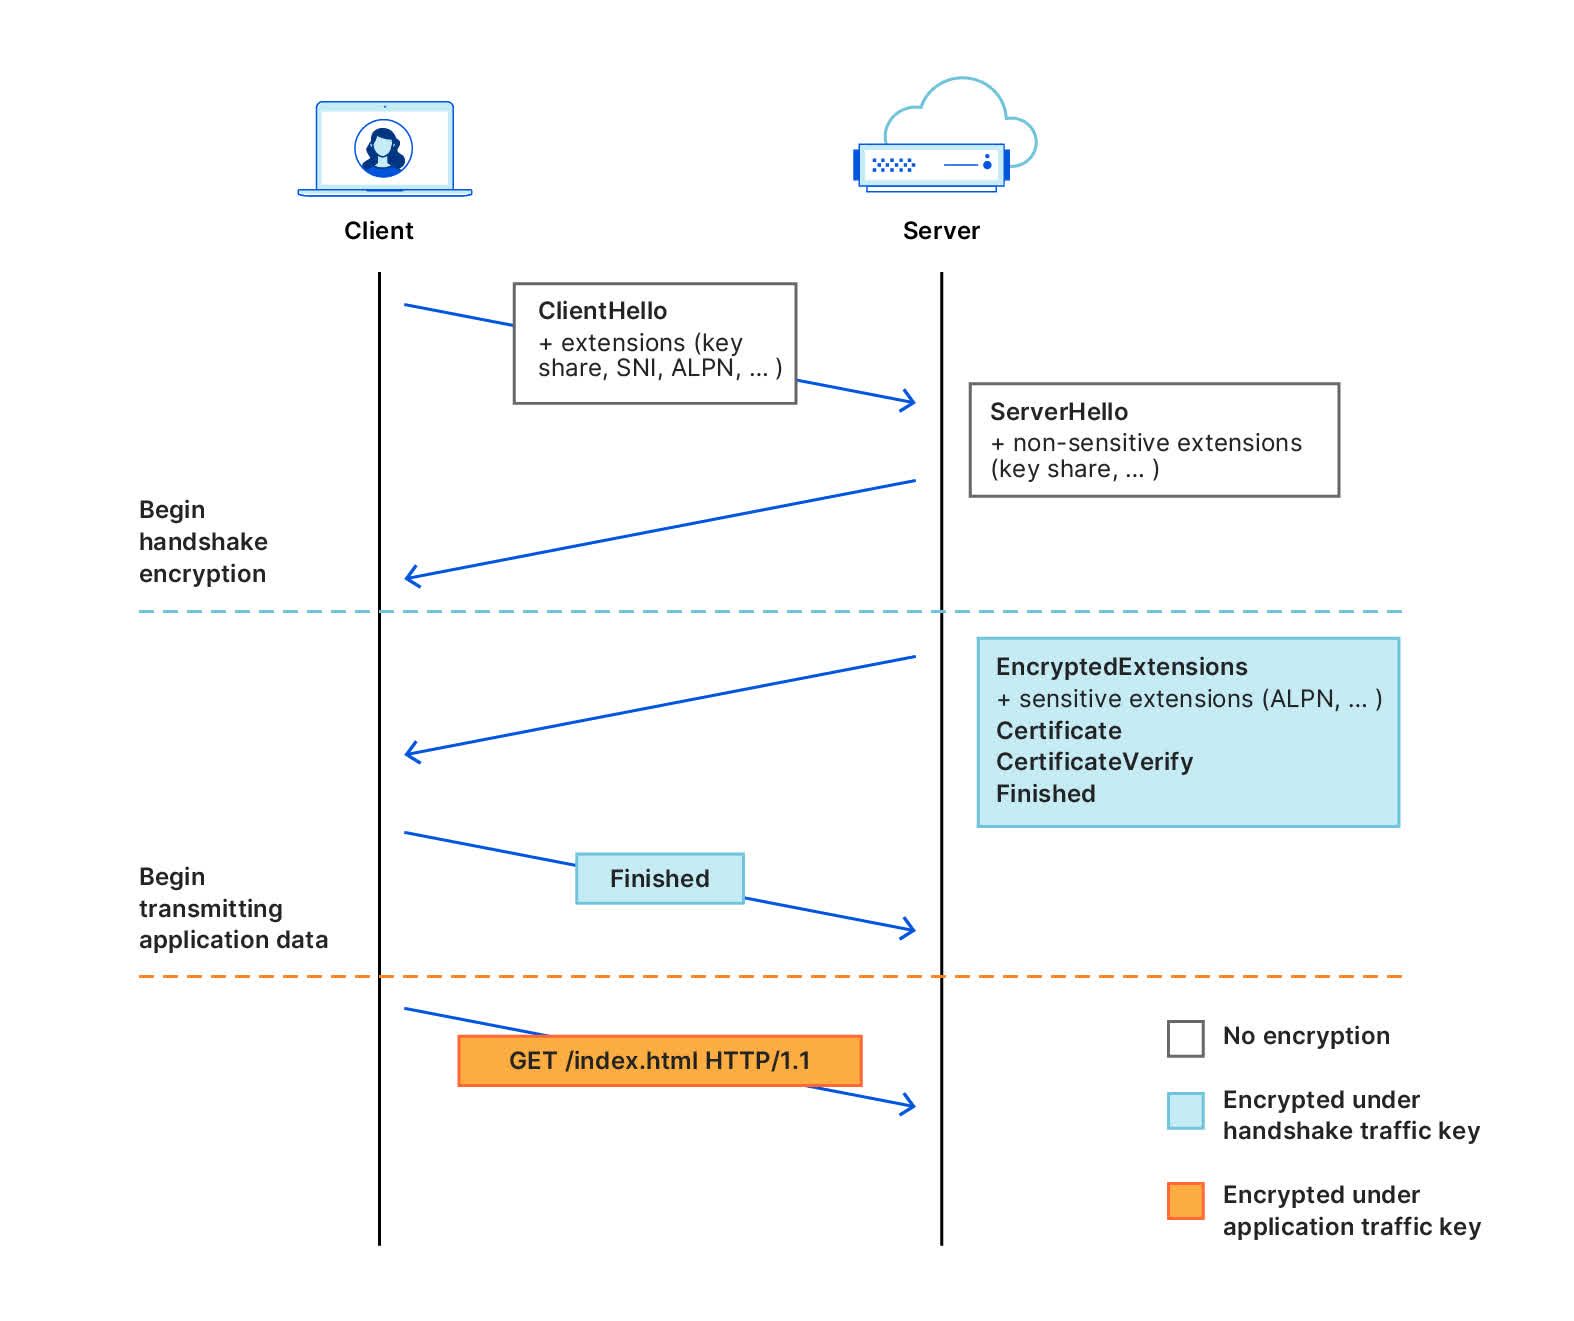
TLS Handshake
-
Client sends ClientHello (plaintext)
-
Includes the client's key share for key exchange (e.g., ECDHE public value) and SNI.
-
Server sends ServerHello (plaintext)
-
Includes the server's key share for key exchange (e.g., ECDHE public value).
-
Both client and server compute the shared secret (pre-master secret)
-
Using their own private key and the other party's public key, both sides compute the same pre-master secret via ECDHE
-
Both sides create the master key and session keys
-
The client and server use the shared secret from the key exchange, combined with random numbers sent earlier, to generate the main encryption keys using a secure algorithm (HKDF).
-
This step happens before any encrypted handshake messages are sent.
-
Server sends encrypted handshake messages
-
Server sends EncryptedExtensions, Certificate, CertificateVerify, and Finished messages, all encrypted with the handshake keys.
-
Client verifies server and sends its own encrypted messages
-
Client verifies server certificate and Finished message, and (if requested) sends its own Certificate and CertificateVerify, then sends its Finished message—all encrypted.
-
Subsequent handshake messages are encrypted
-
Both sides use the derived session keys to encrypt all further application data.
[!NOTE]
The preMasterKey is only used for internal calculation of the master key and session keys; it is not used to encrypt, authenticate, or exchange any data directly over the network.
Xray-core Implementation
Client
In Xray-core, all packages responsible for encapsulating and transmitting proxy traffic are placed in the transport/internet directory, and the reality package is no exception:
1 2 3 4 5 6 7 8 | |
The key to initiating a REALITY connection is in reality.go, where func6 UClient is called when other packages initiate a REALITY connection, and is the most important functional entry point for the client part of the package:
1 | |
The UClient function is a complex implementation that creates a REALITY client connection. This function establishes a TLS connection using the uTLS library with REALITY protocol enhancements, which includes custom handshake modifications and anti-detection mechanisms.
Initial Setup
1 2 3 4 5 6 7 8 9 | |
- Creates a uTLS configuration with custom certificate verification (
VerifyPeerCertificateverify the validity of the server certificate and the server identity.)
Fingerprint Setup
1 2 | |
- Gets a TLS fingerprint to mimic specific browsers/clients
- Golang's ClientHello has a very unique fingerprint that stands out particularly on mobile clients where Go isn't popular. This makes circumvention tools built with standard Go TLS libraries easily identifiable and blockable with minimal collateral damage. We need to randomized fingerprint to avoid ClientHello request getting blocked.
Custom Handshake
REALITY clients use the Session ID field space in TLS Client Hello to covertly mark the client so that the server can distinguish between censors and legitimate REALITY clients. The Session ID field was originally used for the 0-RTT session resumption mechanism of TLS1.2. Although TLS1.3 switched to the session resumption mechanism based on PSK (Pre-shared Key), in order to maintain compatibility with TLS1.2 as much as possible, the Session ID field was retained while TLS1.3 was deprecated. Therefore, the Session ID used for each TLS1.3 connection should be randomly generated.
1 2 3 4 5 6 7 8 9 10 11 12 13 14 15 16 17 18 19 20 21 22 23 24 25 26 27 28 29 30 31 32 33 34 35 36 37 38 39 40 41 42 43 44 45 46 47 | |
Anti-Detection Spider Mechanism
If the connection isn't verified (meaning it's likely being inspected), the function launches a sophisticated anti-detection mechanism:
- HTTP/2 Client Setup
1 2 3 4 5 6 7 8 | |
- Creates an HTTP/2 client that reuses the TLS connection
-
This simulates normal browser behavior
-
Web Crawling Simulation
1 2 3 4 5 6 7 8 9 10 11 12 13 14 15 16 17 18 19 20 21 22 23 24 25 26 27 28 29 30 31 32 33 34 35 36 37 38 39 40 41 42 43 44 45 46 47 48 49 50 51 52 53 54 55 56 57 58 59 60 61 62 63 64 65 66 67 68 69 70 71 72 73 74 75 | |
- Maintains a map of discovered URLs for each server
- Performs GET requests to simulate real browsing
- Extracts links from responses to build a realistic browsing pattern
- Uses random delays and multiple concurrent requests
-
Sets realistic headers including User-Agent and Referer
-
Realistic Browsing Behavior:
-
Random cookie padding
- Multiple concurrent requests
- Link following with proper referer headers
- Random timing intervals
Server
The key to the REALITY server processing TLS handshake is func Server in the file tls.go.
- Client Hello Analysis: Reads and validates the TLS Client Hello message
- Key Exchange: Uses X25519 key exchange with the client's key share
- Session ID Decryption:
- Derives an authentication key using HKDF
- Decrypts the client's session ID using AES-GCM
- Extracts client metadata (version, timestamp, short ID)
- Validation: Checks if the client meets configured criteria:
- Client version within allowed range
- Timestamp within acceptable time difference
- Valid short ID
Based on authentication results:
- Valid Client: Processes the TLS handshake and establishes a secure tunnel
- Invalid Client: Forwards traffic directly to the target (appears as normal traffic)
References
- https://blog.cloudflare.com/handshake-encryption-endgame-an-ech-update/
- https://objshadow.pages.dev/en/posts/how-reality-works/